Powered by Blogger.
Showing posts with label decals. Show all posts

Pink Saturday 10/16/2010 and Kitchen Cabinet Redo

Friday, October 15, 2010

Happy pink saturday! Please click on the logo below for Beverly's How Sweet The Sound and see the other participants.


I'm still alive and still doing massive amounts—for me anyway—of physical therapy each day and also having to take ibuprofen. I truly don't want to get hooked on pain killers and ibuprofen does help with the pain. I met a woman in PT who had this problem and she said it took her 8 months! I can't/won't be away from blogging for 8 months so we'll see how it works out.

I am still skimming through the blogs a few minutes each day but I simply can't sit here long enough to comment, so please, please forgive me.

Hubby and I received free movie tickets a couple of months ago for my birthday and couldn't find any clean PG movies to go see until I heard about Secretariat. We saw it today and if you haven't seen it, run to your local theater and see it. It was one of the most wonderful movies we've seen. Kids will enjoy this too. We loved it! Just like a movie should be. Great, great movie.
~*~


I finally finished with the kitchen cabinet I bought a couple of months ago since it was easier for me to stand than sit with the ham string and groin muscles pulled. I am very happy with it. Love Bunny, however, thinks I'm nuts taking a perfectly good oak cabinet, painting it and then sanding the heck out of it so it will look vintage, distressed and romantic!

This is what I purchased at Home Depot originally.

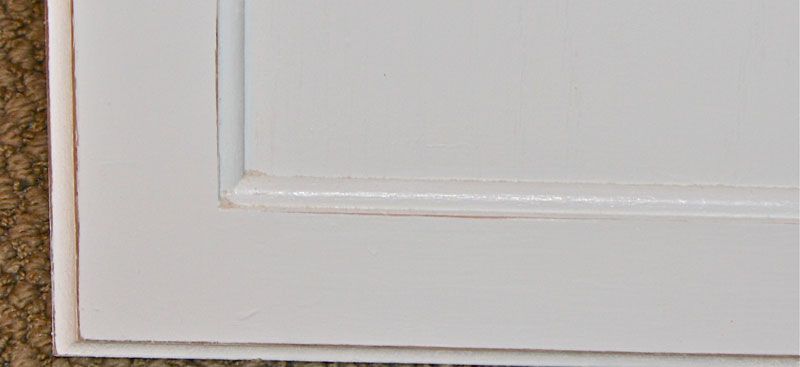
This is what I've been doing to it for several days. This is the door.

The cabinet.

The side panels.

Sanding/distressing


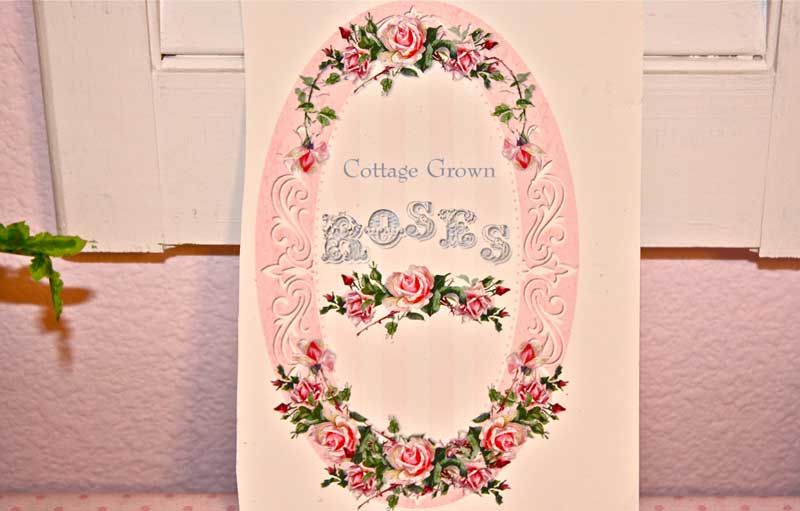
With all the decals I already have, I was wondering which one to use on it. That was a big decision. I loved this one but it was a bit small for such a large door.

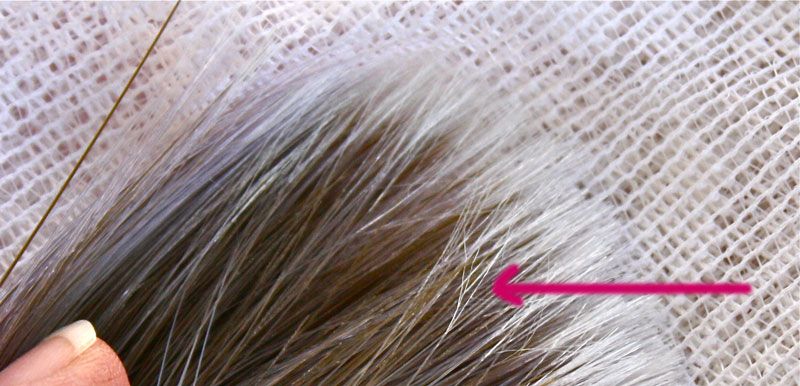
The only brush to use as far as I'm concerned. This was a fantastic brush. If you use a cheap brush, you are wasting your time. It was well worth the money I paid. It made a world of difference in applying Zinssers primer.

When I tell you all something that can make a huge difference in what the outcome will be, I like to give you the reason why it is so. The man at Home Depot explained it to me this way in its simplest form. One, it is made in the USA and that makes a difference to me most times. Two, it's put together much better for that reason alone. Three, the bristles are frayed—as you can see by the closeup photo and that makes the stroke much, much smoother. A friend of ours painted houses while putting himself through college and said he's got the same brush he used 30 years ago and continues to use it to this day and it's a Purdy. That's how good they are. It is definitely worth the few dollars extra you would pay. And I didn't even get the highest priced one for which I paid under $20.00


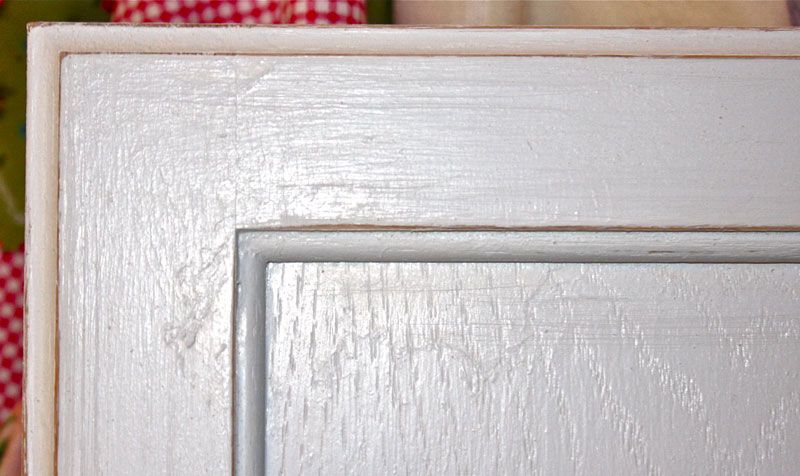
More distressing outside when the weather turned nice.


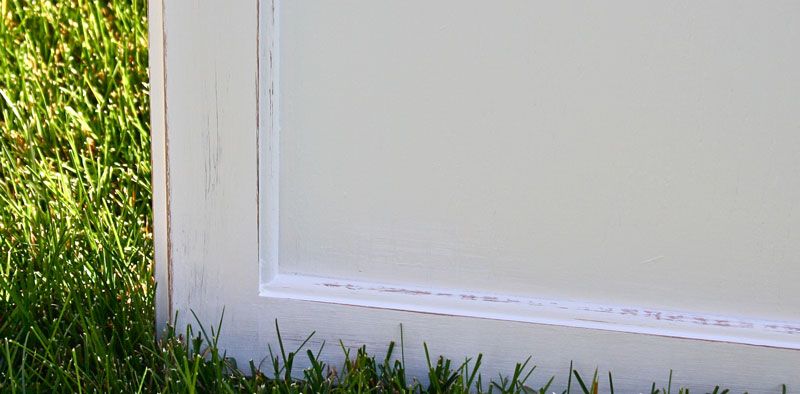
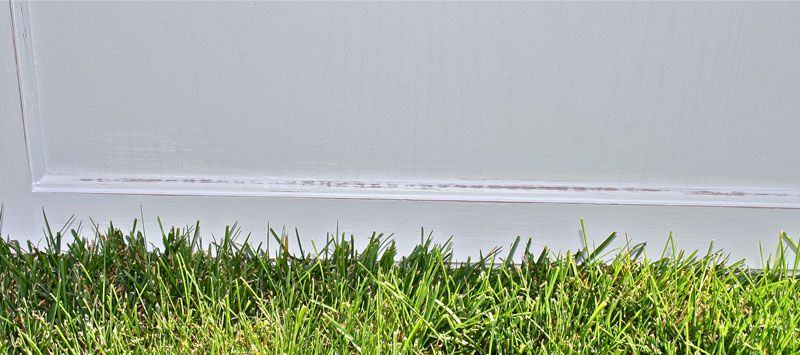
The left side will be where it opens, hinged on the right. I scruffed it up a bit more there where wear and tear would naturally occur.

The decal I finally decided I liked best for the kitchen cabinet.

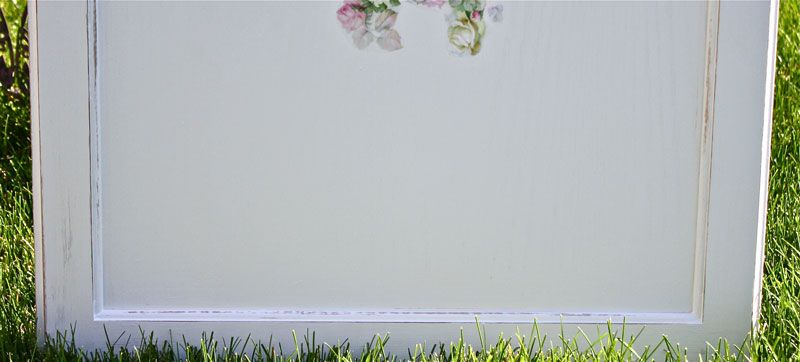
The finished door. I do have a white ceramic knob with a rose decal on it that hubby will have to put on it when we decide to hang it, which should be in the next few days.

This is the knob I'll be putting on it.

This was put up early this morning. Things were changed around on the kitchen walls though.

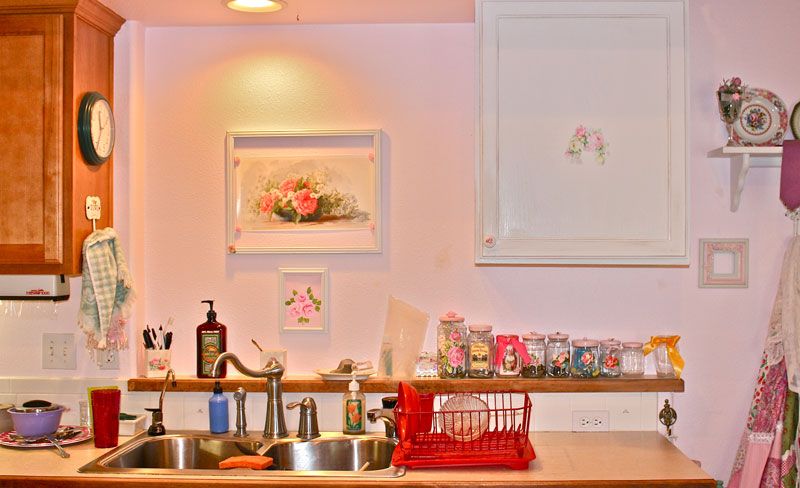
The white cabinet after I painted it and shabbied it up to look vintage.
Side view and a little bit of the shelf we changed to that area.

I had to find 2 places for 2 shelves that were there the cabinet is now.

Close up of the view when I'm at the sink now. I love looking at roses and these two arrangements do the trick for me.

The other one went on the other side of the kitchen near the patio door on the left. These may not stay decorated exactly like this, only time will tell.

~*~

New Faux Fireplace Screen

Saturday, August 22, 2009

Hubby made this screen for me some weeks ago and since I have a "faux mantle/fireplace" I needed a faux fireplace screen, but I just now found time to decorate it. He keeps taking me to California, Seattle, the wilds of Idaho to camp (more on that soon!) and letting the relatives visit so I've been so tired and busy taking care of those things I've been neglecting the house.

So I ordered some decals on ebay, waited a week for them to arrive and put them on after our return from Seattle. Neither one of us like the decals on the faux fireplace screen so I took them off. I thought they'd be bigger than they actually were and they simply didn't work well on it. I think you'll agree it looks like a shotgun sprayed it.

Since I do much better with fabric I decided to cover it with some shabby roses barkcloth and any other pretty fabric that I had enough of without having to purchase more. (Hubby's kinda weird about all the fabric I have.) I left 2 small decals on the sides but the front I covered with fabric that I wet with liquid starch and "glued" it on with that so it can be taken off easily when I tire of it. (This has been known to happen frequently.) :-) I added some netting to the top and it looks much better than in the photo but I'm going take it off. I don't like it on there much. The fabric and roses and lace can really stand on its own merit. But I thought I'd show you what it looked like at first.

And this is how it finally looks. The picture above was taken at night and these two were taken in full daylight so I wanted to capture them accurately.

I like the final look of it. As is always the case, it looks much prettier in person.
~*~

On our trip to Washington state we saw a bunch of cows lying in pastures—all of them. I asked Love Bunny why they were all lying down and he said they must have been "party hardy animals" who were too pooped to pop. He's such a kidder.
~*~

Miscellany

Monday, June 22, 2009

There are times when I don't have a lot to say. Marvelous, isn't it?! Anyway, today I thought I'd just share a thing or two and get back to the house work and garden and let you enjoy NOT listening to me so much!

Looking through some clothing catalogs recently I realized the T-shirt is now becoming somewhat dressed and jazzed up a bit. So I took this plain black one and added some black with roses fabric I ruffled and sewed it on. Has anyone else noticed the T's are not so drab and plain anymore? Some have lace and are pleated in front. Just a whole different look. So for me instead of buying a lot of new ones I'm just froufrou-ing up the old ones.


Aren't these decals lovely? I saw them and couldn't resist but now I'm deciding where to put them. They are 7 1/4" x 4 1/2". So where could they go nicely? Any suggestions?

Redoing a Vintage Chair

Saturday, April 4, 2009

I bought this vintage chair at a local antique store several weeks ago. I wasn't sure where I wanted to put it but I knew I DID want to redo the cruddy seat! It was pathetic, I tell ya. However, since there wasn't any place else to put it except my sewing and craft room, I put it in there reluctantly—first because it was the only place I had left and second because I knew having it in my way would prompt me to get at it quicker. *Wink*..........

The seat is very hard wood with no "cushioning" and it had the most atrocious and filthy fabric on it I've ever come across. Three layers of crud. I took off the first layer of fabric that had been put on with tiny upholstery tacks. (This tells me it was put on there before the advent of staple guns and the rusted tacks proves its "vintageness"!) The second layer of "fabric" was a vinyl that was so old it "snapped" off as I was removing the tacks. *Sigh*.... The third layer looks like something out of the 40s or 50 at least. I had to go wash up once while doing this my hands were so dirty! The chair was in "scruffy" shape—can we say "shabby" here?! Just the right amount of "wear and tear" to call it that. Squeeeeeeeal!!! So I didn't bother painting it but did give it a dusting and wipe down. Yuck.

I then found a piece of shabby chic roses fabric in my stash. I put some upholstery fiberfill over the top and then added the fabric. I think it turned out quite well actually.


Then I added some roses decals to the back and voilà here it is. I don't think it's sturdy enough for a person to sit on it because one of the dowels in the back had to be replaced and while doing that Love Bunny noticed that a piece of wood on one of the back legs was cracked. It must have fallen off one day while in the craft room and evidently—I have no idea how this happened(!) Can I help it if phone cords and vacuum cords get in my way while vacuuming?—and got s*cked up in the vacuum which is a Dyson and s*cks up quite good while mutilating the wood piece. *Heavyyyy sigh here*! I emptied the Dyson and everything in there was dust or so tiny there was no hope to fix it. If there is then hubs will find a way. That man is a miracle worker. However, his time frame is not MY time frame here so I'm doing the best I can, chicks! I think it will go in my bedroom to hold books or pillows from our bed at night. I can always use another chair in there besides the 2 in there now. Right?!?!? *Sigh*........

The Pink Painted House

Wednesday, December 17, 2008

My greatest treasure is hubby. He gives me license to do as I darn well please. Whatever I want to do is just fine with him 99.9% of the time. Well, there is the occasional "I wish you wouldn't do that", but they are very few and very far between. When I said I wanted to paint the house pink, fine with him. So these are the first photos of the living room, kitchen and dining area for you to see.

I feel like I'm living in a confectionery store now. I absolutely love and adore it! How can a simple color make such a difference in a room and in a mood? Yesssss, it truly does. It just lifts my spirits up. As most of you know who've seen this blog before, I recently did my office/painting room and my sewing/craft room in a vibrant pink. This time for the main areas of the house I went a shade lighter. I did it this way.

A trip to Home Depot and looking at their samples got me thinking about a paler pink than the other two rooms simply because if I changed any furnishings in the living room it might be a tad hard to "coordinate" things with the wall color if it was too bright pink. So I picked a color I love, Behr's candy tuft, and had them make me up a quart with 1/2 the colorant in it. When I came home and painted it on several walls to test it, it seemed more lavender because the only colorant in it was magenta. Magenta has blueish tones to it. So I picked another color, Behr's cupid arrow. It had different colorants in it and after getting them to put in 1/2 the colorant again, that color seemed perfect after I came home and painted patches on different walls again and lived with it for a couple of days. The paint stores will do anything you want. You don't have to accept just their "colors." Then I bought 5 gallons to start the painting. It was definitely pink but not "in your face" pink, which I really like anyway, but wanted something softer in the main rooms and hallways.

Then there is the concern of getting the "pink" to show properly on different monitors. These past 3 weeks I've been on my laptop and notice huge differences between it and the desktop and huge monitor in my office. So I tried to pick settings that show it accurately. Impossible, chicks!! The closet I can describe it is "a tad more than light pink but definitely pink." I'm loving it.

I also decided that I had put too much stuff on the old beige-y walls to try and obliterate the color with the frou-frou, so this time I "scaled" down a bit - scaled down is a relative term here. I "reassigned" things to different places! ;-) Case in point - the living room. I brought the shutters I painted white from the dining area into the plant shelf in the living room. I like it much better here than in the dining area.

Notice the uncluttered look in that area now. Something here, just less "fluff" and the pink shows quite well. I brought in a picture that my brother and his wife gave me from the living room and put it on the right side of that entry.


I also brought the leather chair from the family room into the living room. It looks much better in there than in the shabby chic style family room. I prefer my living room a tad more formal than the family room.

The archway separating the living room and the dining area is only about 4" wide and being from California, I don't want anything up there that can kill me if it falls so I've had these little blocks of wood that I put little roses decals on and put the up there for a little bit of pizzazz.

Yesssssssss, the train limited edition prints still went up there to satisfy hubs but I put the pink suitcases back up there to "feminize" it a bit and only one suitcase did I leave in its original vintage state. But by the white door is probably the most accurate of the color of the walls I could get on THIS monitor. Yours will appear differently probably. That hallway on the left is still the beige-y color. The painter's wife went into labor and he had to leave! I'm soooo excited for them, but not sure when he'll be back to finish the hallways. You can see he prepped by putting up tape and can definitely see the color difference from the walls in the room to the wall on the other side of that archway.

Another view of the dining side of the archway and the wall to the right of that plant on the living room side is the wall in the hallway that still has the original color on it. See how much brighter and cleaner it looks. Squeeeeeeeeeal. I love it, chicks!!!
To be continued.................

Vintage School Desk

Wednesday, October 1, 2008

Love Bunny was kind enough to go look at this vintage desk today I spotted on craigslist. He brought it home!!! Squeeeeeealllll!!! Okay, now I have to prime and paint it and add some roses. I'll probably do decals. I don't have the courage to paint it yet! Hah.........

Barefoot Roses Suitcase!

Wednesday, May 7, 2008


I have a number of vintage suitcases, large and small, that I painted white. I added decals of roses to them and put them on plant shelves around my home. But after seeing one the other day with fabric on it, I was smitten! I have soooo much fabric that I decided to cover them in fabric. I've started with a beautiful pink roses one and will continue until all are covered in roses fabric. Could you ask for anything sweeter than this??!! And I only paid 50¢ for each of the suitcases. What a stunning difference it makes!


Popular Posts